15 Coccyx Pain Exercises: Complete Physical Therapist-Approved Routine
Last Updated: March 9, 2026 | Reviewed by: Dr. Sarah Mitchell, MD & Mark Johnson, DPT
These 15 exercises target the root causes of coccyx pain—tight pelvic floor muscles, weak core stabilizers, and poor posture. Perform this routine daily for 4-6 weeks for best results.
💡 Before You Start: If pain increases during any exercise, stop immediately. Consult a physical therapist for personalized guidance.
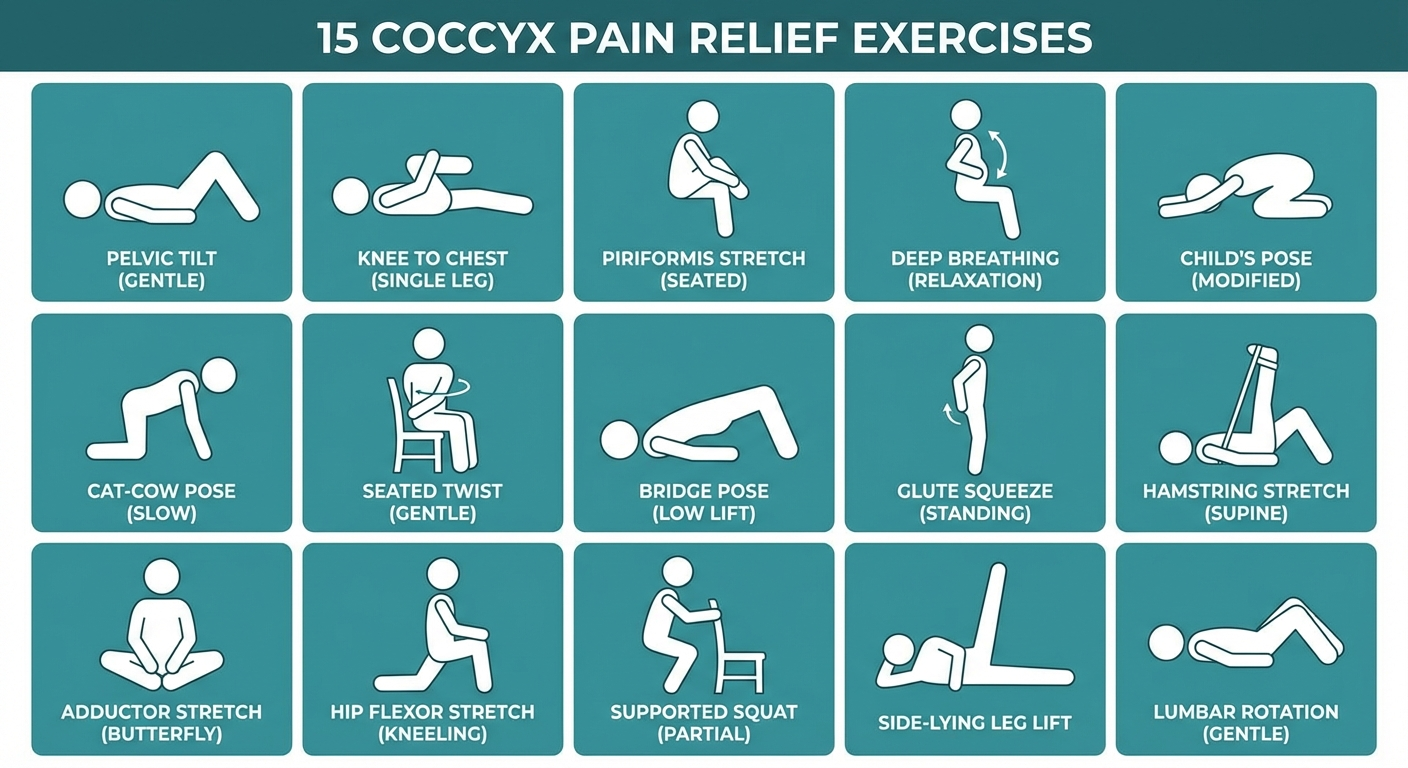
1. Child's Pose (Balasana)
Target: Lower back, hips, pelvic floor | Hold: 60-90 seconds
- Start on hands and knees, wrists under shoulders, knees hip-width apart
- Sit back onto your heels, extending arms forward on the floor
- Lower your forehead toward the ground
- Let your belly relax between your thighs
- Breathe deeply, feeling your lower back expand
- Hold for 60-90 seconds
Modification: Place a pillow between hips and heels if uncomfortable. For deeper stretch, walk hands to the right/left.
Why it works: Gently stretches the lower back, releases pelvic floor tension, and creates space in the sacral region.
2. Cat-Cow Stretch (Marjaryasana-Bitilasana)
Target: Spine mobility, core activation | Reps: 10-15 cycles
- Start on hands and knees in tabletop position
- Cow (Inhale): Arch your back, drop belly, lift tailbone and head
- Cat (Exhale): Round spine up to ceiling, tuck tailbone, drop head
- Move slowly, synchronizing breath with movement
- Repeat 10-15 cycles
Tip: Focus on the tailbone movement—tucking and lifting—to specifically mobilize the coccyx area.
3. Pelvic Tilt (Supine)
Target: Core activation, pelvic alignment | Reps: 15-20
- Lie on your back with knees bent, feet flat on floor
- Place hands on lower belly
- Flatten your lower back against the floor by engaging abs
- Hold for 5 seconds, feeling your core engage
- Release and return to neutral
- Repeat 15-20 times
Progression: Add a small pillow under your hips for comfort if needed.
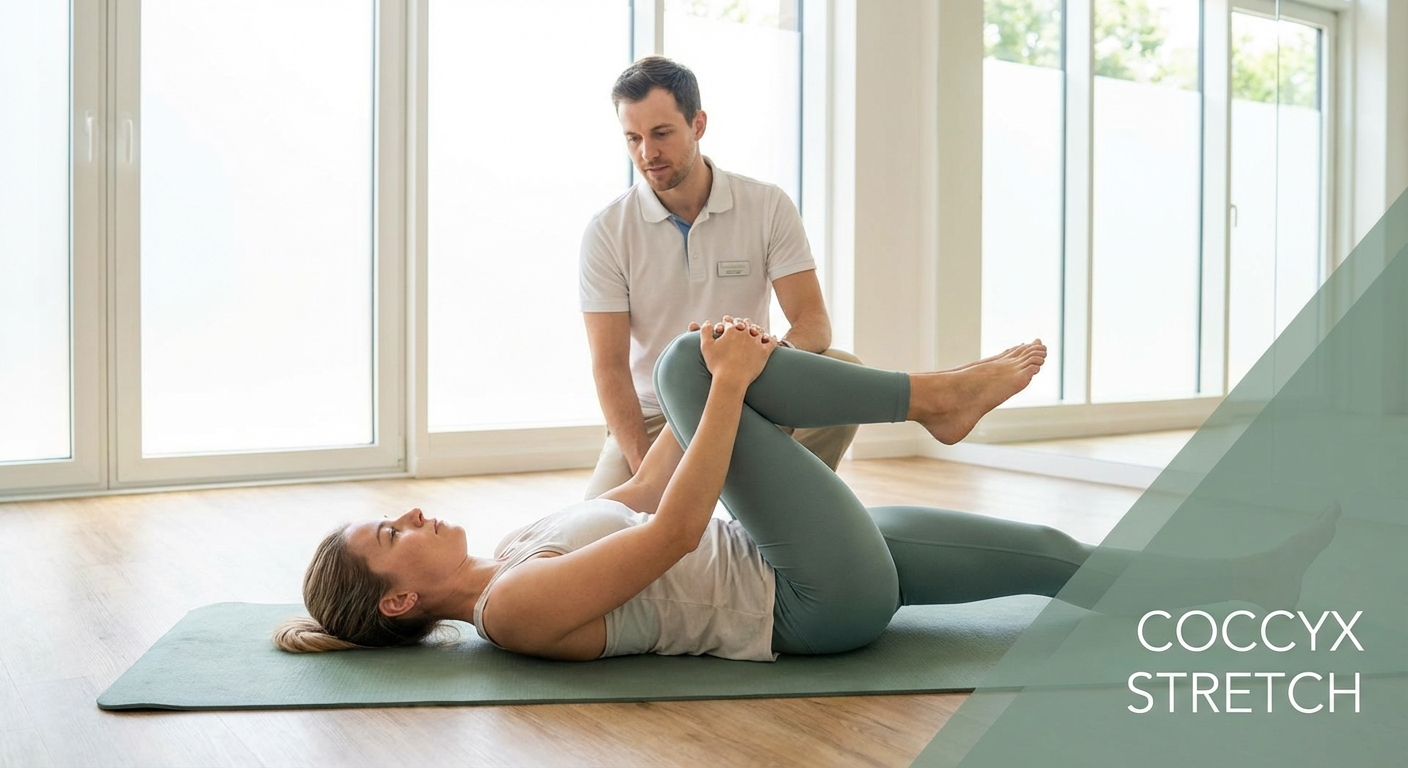
4. Knees-to-Chest Stretch
Target: Lower back, glutes | Hold: 30-60 seconds
- Lie on back, knees bent
- Bring both knees toward your chest
- Wrap arms around shins or behind thighs
- Gently pull knees closer (don't force)
- Hold 30-60 seconds, breathing deeply
- Release slowly
Variation: Rock gently side-to-side to massage lower back.
5. Supine Spinal Twist (Supta Matsyendrasana)
Target: Lower back, obliques | Hold: 30 seconds each side
- Lie on back, knees bent, feet flat
- Extend arms out to sides in "T" shape
- Drop both knees to the right side
- Turn head to the left
- Hold 30 seconds, feeling the stretch
- Return to center, repeat on other side
Tip: Keep both shoulders on the ground for full benefit.
📋 PHASE 2: Strengthening (Week 3-4)
Follow along with this PT-guided exercise routine specifically for tailbone pain relief.
Focus: Build core stability, strengthen pelvic floor, improve posture
6. Glute Bridge
Target: Glutes, core, pelvic floor | Reps: 3 sets of 12-15
- Lie on back, knees bent, feet hip-width apart
- Arms at sides, palms down
- Engage core and squeeze glutes
- Lift hips toward ceiling
- Hold at top for 3 seconds, squeezing glutes
- Lower slowly with control
- Complete 3 sets of 12-15 reps
Progression: Add a resistance band above knees for extra challenge.
7. Bird Dog
Target: Core stability, balance | Reps: 10 each side
- Start on hands and knees in tabletop
- Engage core to keep back flat
- Extend right arm forward and left leg back
- Hold 5 seconds, maintaining balance
- Return to start with control
- Alternate sides for 10 reps each
Key: Don't let your back arch—keep it neutral throughout.
8. Dead Bug
Target: Deep core muscles | Reps: 10 each side
- Lie on back, arms extended toward ceiling
- Lift legs, knees bent at 90 degrees
- Lower right arm and left leg simultaneously
- Keep lower back pressed to floor
- Return to start, repeat other side
- Complete 10 reps each side
Modification: Keep knees bent if straight legs are too challenging.
9. Side Plank (Modified)
Target: Obliques, core stability | Hold: 20-30 seconds each side
- Lie on side, knees bent, propped on elbow
- Lift hips off ground, creating straight line
- Hold 20-30 seconds, breathing normally
- Lower with control
- Repeat on other side
Progression: Straighten legs for full side plank when ready.
10. Clamshells
Target: Hip rotators, glute medius | Reps: 15 each side
- Lie on side, knees bent, stacked
- Keep feet together
- Open top knee like a clamshell
- Hold 2 seconds at top
- Lower with control
- Do 15 reps, switch sides
Tip: Add resistance band above knees for progression.
📋 PHASE 3: Advanced Recovery (Week 5+)
Focus: Deep stretching, advanced strengthening, functional movement
Target: Deep hip rotators | Hold: 30-45 seconds each side
- Lie on back, knees bent
- Cross right ankle over left kneeThread hands behind left thigh
- Gently pull thigh toward chest
- Feel stretch in right glute/hip
- Hold 30-45 seconds, switch sides
Why it matters: The piriformis muscle often refers pain to the coccyx when tight.
12. Happy Baby Pose (Ananda Balasana)
Target: Hips, groin, lower back | Hold: 60-90 seconds
- Lie on back, bring knees toward chest
- Grab outside edges of feet
- Open knees wider than torso
- Flex feet, heels toward ceiling
- Gently pull feet down, knees toward floor
- Hold 60-90 seconds, rocking side to side
Benefit: Opens hips and releases tension in pelvic floor.
13. Quadruped Hip Circles
Target: Hip mobility, pelvic control | Reps: 10 circles each direction
- Start on hands and knees
- Lift right knee off ground
- Make large circles with knee
- 10 circles forward, 10 backward
- Switch legs and repeat
Focus: Keep core engaged, don't arch lower back.
14. Pelvic Clocks
Target: Pelvic mobility, awareness | Reps: 10 circles each direction
- Lie on back, knees bent, feet flat
- Imagine pelvis as clock face
- Tilt pelvis to 12 o'clock (flatten back)
- Rotate to 3, 6, 9 o'clock positions
- Make smooth circles
- 10 circles each direction
Purpose: Improves pelvic mobility and body awareness.
15. Diaphragmatic Breathing with Pelvic Floor Relaxation
Target: Pelvic floor relaxation, stress reduction | Duration: 5 minutes
- Lie on back, knees bent, one hand on belly
- Inhale deeply through nose for 4 counts
- Feel belly rise, pelvic floor drop/relax
- Exhale slowly through mouth for 6 counts
- Continue for 5 minutes
Critical: Most coccyx pain involves pelvic floor tension. This exercise teaches conscious relaxation.
Daily Routine Schedule
| Time |
Exercises |
Duration |
| Morning |
Child's Pose, Cat-Cow, Pelvic Tilt, Breathing |
10-15 min |
| Midday |
Standing stretches (every 2 hours) |
5 min |
| Evening |
Full strengthening routine + deep stretches |
20-25 min |
Expected Timeline
- Week 1-2: Pain may initially increase as muscles activate (normal)
- Week 3-4: Noticeable improvement in sitting tolerance
- Week 6-8: Significant pain reduction for most people
- Week 12+: Continue maintenance routine 3x/week
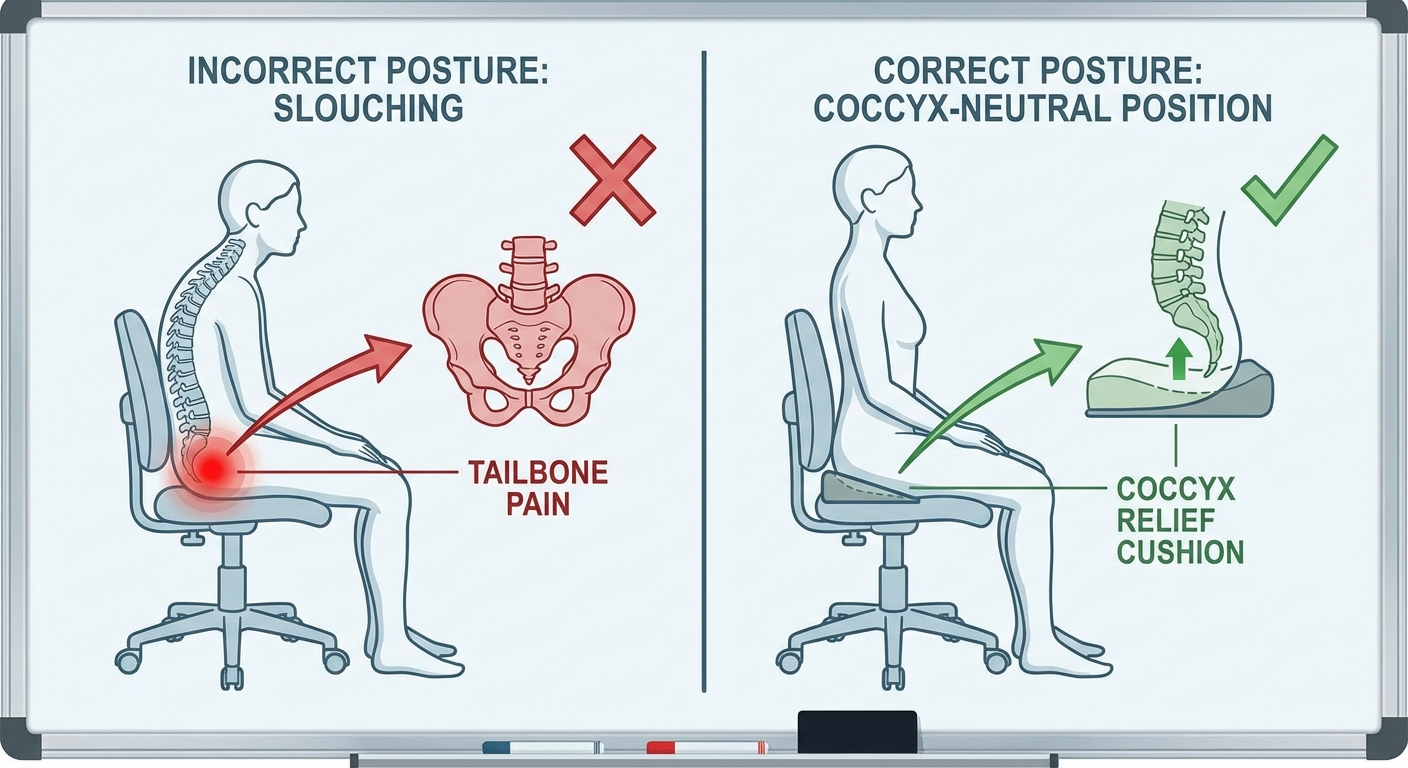
Pro Tip: Combine these exercises with a quality coccyx cushion for maximum relief. Check our
top-rated cushions.
Get the Complete Video Exercise Library
Follow along with 20 HD videos led by a physical therapist. Includes progress tracking and personalized modifications.
Access Full Program →
Frequently Asked Questions
How often should I do these exercises?
Daily for best results. The routine takes 30-40 minutes total when split throughout the day.
What if an exercise hurts?
Stop immediately. Some discomfort is normal, but sharp pain means you need to modify or skip that exercise.
Can I do these if I had coccygectomy surgery?
Wait 6-8 weeks post-surgery, then start with Phase 1 only. Consult your surgeon before beginning.
How long until I see results?
Most people notice improved sitting tolerance within 1-2 weeks. Significant pain reduction typically occurs by week 4-6.
Understanding Your Condition
Knowledge is power when dealing with coccyx pain. The more you understand about your condition, the better equipped you'll be to manage it effectively and communicate with healthcare providers.
Coccyx pain, while often dismissed as minor, can significantly impact quality of life. The coccyx serves as an attachment point for multiple muscles and ligaments, making it crucial for pelvic stability and function. When injured or irritated, the resulting pain can affect sitting, standing, walking, and even sleeping.
Risk Factors
Several factors increase the likelihood of developing coccyx pain:
- Body weight: Higher BMI increases pressure on the coccyx when sitting
- Occupation: Jobs requiring prolonged sitting or heavy physical labor
- Activity level: Both sedentary lifestyle and high-impact sports
- Previous injury: History of falls or trauma to the area
- Age: Degenerative changes become more common with aging
- Gender: Women are affected more frequently than men
- Pregnancy: Hormonal changes and childbirth increase risk
Diagnostic Process
Proper diagnosis is essential for effective treatment. Your healthcare provider may use:
- Physical examination: Palpation of the coccyx and surrounding structures
- Dynamic testing: Assessing pain with movement and position changes
- Imaging: X-rays, MRI, or CT scans to visualize bone and soft tissue
- Diagnostic injections: Local anesthetic to confirm pain source
- Neurological exam: Ruling out nerve involvement
Treatment Options Overview
Treatment typically progresses from conservative to more invasive:
Conservative Treatments (First Line)
- Activity modification and ergonomics
- Coccyx cushions and seating aids
- Physical therapy and exercises
- Medications (NSAIDs, muscle relaxants)
- Heat and cold therapy
- Manual manipulation
Interventional Treatments
- Corticosteroid injections
- Nerve blocks
- Radiofrequency ablation
- Ganglion impar blocks
Surgical Options
- Coccygectomy (tailbone removal) - last resort
Lifestyle Modifications
Long-term management often requires lifestyle changes:
Daily Habits
- Take standing breaks every 30 minutes
- Use proper lifting technique
- Maintain healthy weight
- Stay active with low-impact exercise
- Practice good posture
- Use supportive seating
Workplace Ergonomics
- Adjust chair height for proper hip angle
- Use standing desk when possible
- Position monitor at eye level
- Keep frequently used items within reach
- Consider ergonomic accessories
Nutrition and Healing
Proper nutrition supports tissue healing and reduces inflammation:
- Anti-inflammatory foods: Fatty fish, leafy greens, berries, nuts
- Hydration: Adequate water intake for tissue health
- Protein: Essential for tissue repair
- Vitamins and minerals: Vitamin D, calcium, magnesium
- Avoid: Excessive sugar, processed foods, alcohol
Exercise and Movement
Appropriate exercise is crucial for recovery and prevention:
Beneficial Activities
- Walking (low-impact, promotes circulation)
- Swimming (supported, full-body)
- Core strengthening (supports pelvis)
- Stretching (maintains flexibility)
- Yoga (gentle, improves body awareness)
Activities to Modify or Avoid
- High-impact sports (running, jumping)
- Prolonged cycling (pressure on coccyx)
- Rowing (repetitive pressure)
- Heavy weightlifting (strain on pelvic floor)
- Contact sports (risk of trauma)
Mental Health Considerations
Chronic pain affects mental health significantly:
- Depression and anxiety are common
- Sleep disturbances worsen pain perception
- Social isolation can develop
- Work stress may increase
- Relationships may be strained
Addressing mental health is as important as treating physical symptoms. Consider counseling, support groups, stress management techniques, and open communication with loved ones.
Building Your Healthcare Team
Effective treatment often involves multiple providers:
- Primary care physician: Initial evaluation and coordination
- Orthopedic specialist: Bone and joint issues
- Physical therapist: Rehabilitation and exercise
- Pain management specialist: Chronic pain interventions
- Psychologist: Coping strategies and mental health
Questions to Ask Your Doctor
- What is causing my specific coccyx pain?
- What treatment options do you recommend?
- How long should I try conservative treatments?
- When should I consider injections or surgery?
- What is my expected recovery timeline?
- Are there activities I should avoid?
- What can I do to prevent recurrence?
Contact your healthcare provider immediately if you experience:
- Severe pain after trauma or fall
- Fever with tailbone pain
- Numbness or weakness in legs
- Loss of bowel or bladder control
- Unexplained weight loss
- Night pain that doesn't improve with position changes
- Signs of infection (redness, warmth, drainage)
Support Resources
You don't have to face this alone:
- Online forums and support groups
- Patient advocacy organizations
- Educational websites and videos
- Local pain management programs
- Physical therapy clinics
Setting Realistic Expectations
Recovery from coccyx pain takes time:
- Acute cases: 2-4 weeks
- Subacute cases: 2-3 months
- Chronic cases: 3-6 months or longer
Patience and consistency with treatment are essential. Celebrate small improvements and don't get discouraged by setbacks.
Prevention Strategies
Once recovered, prevent recurrence:
- Maintain good posture
- Use proper body mechanics
- Stay active and maintain healthy weight
- Use supportive seating
- Take regular movement breaks
- Continue exercises learned in physical therapy
- Address issues promptly if they recur
Research and Advances
Medical understanding of coccyx pain continues to evolve:
- Improved imaging techniques
- Better injection approaches
- Advanced surgical techniques
- Enhanced rehabilitation protocols
- Multidisciplinary treatment models
Insurance and Financial Considerations
Understand your coverage:
- Verify coverage for treatments and procedures
- Understand copays and deductibles
- Check if preauthorization is required
- Consider HSA/FSA for eligible expenses
- Discuss payment plans if needed
Return to Work Planning
If work is affected:
- Discuss modifications with employer
- Request ergonomic accommodations
- Consider phased return schedule
- Document restrictions and capabilities
- Know your rights under disability laws
Travel Considerations
Managing pain while traveling:
- Bring your coccyx cushion
- Take frequent stops on long drives
- Request aisle seat on flights
- Stand and walk when possible
- Pack pain medications in carry-on
Long-Term Outlook
For most people, coccyx pain is manageable:
- 85-90% improve with conservative treatment
- Surgery helps 50-90% of carefully selected patients
- Lifestyle modifications prevent recurrence
- Quality of life can be fully restored
- Ongoing self-care maintains results
Final Thoughts
Coccyx pain can be challenging, but help is available. With proper diagnosis, appropriate treatment, and patience, most people achieve significant relief and return to normal activities. Don't suffer in silence—seek professional help and take an active role in your recovery.
Remember: You are your best advocate. Stay informed, ask questions, and work collaboratively with your healthcare team to find the solutions that work best for you.
Additional Resources and Support
Finding Professional Help
When dealing with coccyx pain, having the right healthcare team makes all the difference. Consider consulting:
- Primary care physician: Your first point of contact for evaluation and referrals
- Orthopedic specialist: For bone, joint, and structural issues
- Physical therapist: Essential for rehabilitation and prevention
- Pain management specialist: For chronic or complex cases
- Chiropractor: Some patients find relief with spinal adjustments
- Acupuncturist: Alternative therapy that helps many
Questions to Ask Healthcare Providers
Make the most of your appointments:
- What is causing my specific pain?
- What are all my treatment options?
- How long should I try conservative treatments?
- What are the risks and benefits of each option?
- What is my expected recovery timeline?
- Are there activities I should avoid?
- What can I do to prevent recurrence?
- When should I follow up?
Support Groups and Communities
Connecting with others who understand can be invaluable:
- Online forums dedicated to coccyx pain
- Social media support groups
- Local chronic pain support meetings
- Patient advocacy organizations
- Educational webinars and workshops
Medical knowledge evolves. Stay current through:
- Reputable medical websites (Mayo Clinic, Cleveland Clinic)
- Peer-reviewed research articles
- Patient education materials
- Healthcare provider newsletters
- Professional medical organizations
Self-Advocacy
You are the expert on your own body:
- Keep detailed symptom records
- Track what helps and what doesn't
- Don't hesitate to seek second opinions
- Ask for clarification when needed
- Bring a list of questions to appointments
- Follow up if symptoms change
Financial Considerations
Understand the costs involved:
- Verify insurance coverage for treatments
- Understand copays and deductibles
- Ask about cash discounts
- Consider HSA/FSA for eligible expenses
- Discuss payment plans if needed
- Get preauthorization when required
Workplace Accommodations
If pain affects your work:
- Request ergonomic assessments
- Ask for standing desk or adjustable workstation
- Discuss flexible break schedules
- Consider modified duties temporarily
- Know your rights under disability laws
- Document requests and accommodations
Travel Tips
Managing pain while traveling:
- Always bring your coccyx cushion
- Take frequent stops on road trips
- Request aisle seats on flights
- Stand and walk when possible
- Pack medications in carry-on
- Allow extra time for comfort breaks
Long-Term Management
For chronic or recurrent cases:
- Develop sustainable daily routines
- Maintain regular exercise habits
- Continue ergonomic practices
- Schedule periodic check-ups
- Stay alert to early warning signs
- Adjust activities as needed
Research and Innovation
The field continues to advance:
- New imaging techniques improve diagnosis
- Minimally invasive procedures evolve
- Better injection methods develop
- Enhanced rehabilitation protocols emerge
- Multidisciplinary approaches improve outcomes
Hope and Recovery
Remember that most people find relief:
- 85-90% improve with proper treatment
- Many achieve complete resolution
- Quality of life can be fully restored
- New treatments offer additional options
- Support is available throughout the journey
Final Encouragement
Dealing with coccyx pain is challenging, but you don't have to face it alone. With persistence, proper care, and support, relief is possible. Take it one day at a time, celebrate small victories, and don't give up hope. Your journey to recovery starts with the next step you take.